Backfilling Basics: Backfilling the Wrong way Often Costs More than Doing it Right
Español | Translation Provided by the CFA
BY R. T. BUCK BARTLEY
As originally published in Concrete Construction, 1991
Editor’s Note: One of the most recently technical inquiries to Association headquarters pertained to a basement foundation that had two walls fail when the builder was backfilling. The concrete contractor was under scrutiny and being considered liable for the failure, citing a potential code violation for reinforcement. However, upon assessment it was determined that no framing and no bracing was in place when the builder determined to complete the backfill on these early-age walls. As we worked to defend this concrete contractor, historical precedent as well as code sections were part of the support. In reviewing this piece from more than twenty years ago, it is amazing to see how common this problem has been and how relevant the advice remains.
Backfilling—an essential step in basement construction—is all too often the beginning of basement destruction. Done improperly, backfilling causes problems that may start before the builder leaves the site and may remain long after he’s gone. But the problems can be avoided by taking a few simple precautions.
There are four key elements to proper backfilling:
- Protecting the foundation wall from damage during backfilling
- Using the right backfill materials
- Compacting the backfill
- Final finishing to the correct grade
Done correctly, these four steps help to ensure that a well-built basement functions the way it’s supposed to, providing the homeowner with dry, usable living space.
Protecting the wall during backfilling
The surest way to protect walls from damage during backfilling is to backfill only after the basement floor slab and the first-floor deck are in place. For the deck, sill plates should be bolted down and joists nailed to the sill plate. This provides the restraint needed to make the wall strong enough to resist earth pressures caused by backfilling.
Home builders seldom want to wait until the deck is in place, however. Early backfilling speeds the framing process by making the foundation more accessible for carpenters so they don’t have to ramp in.
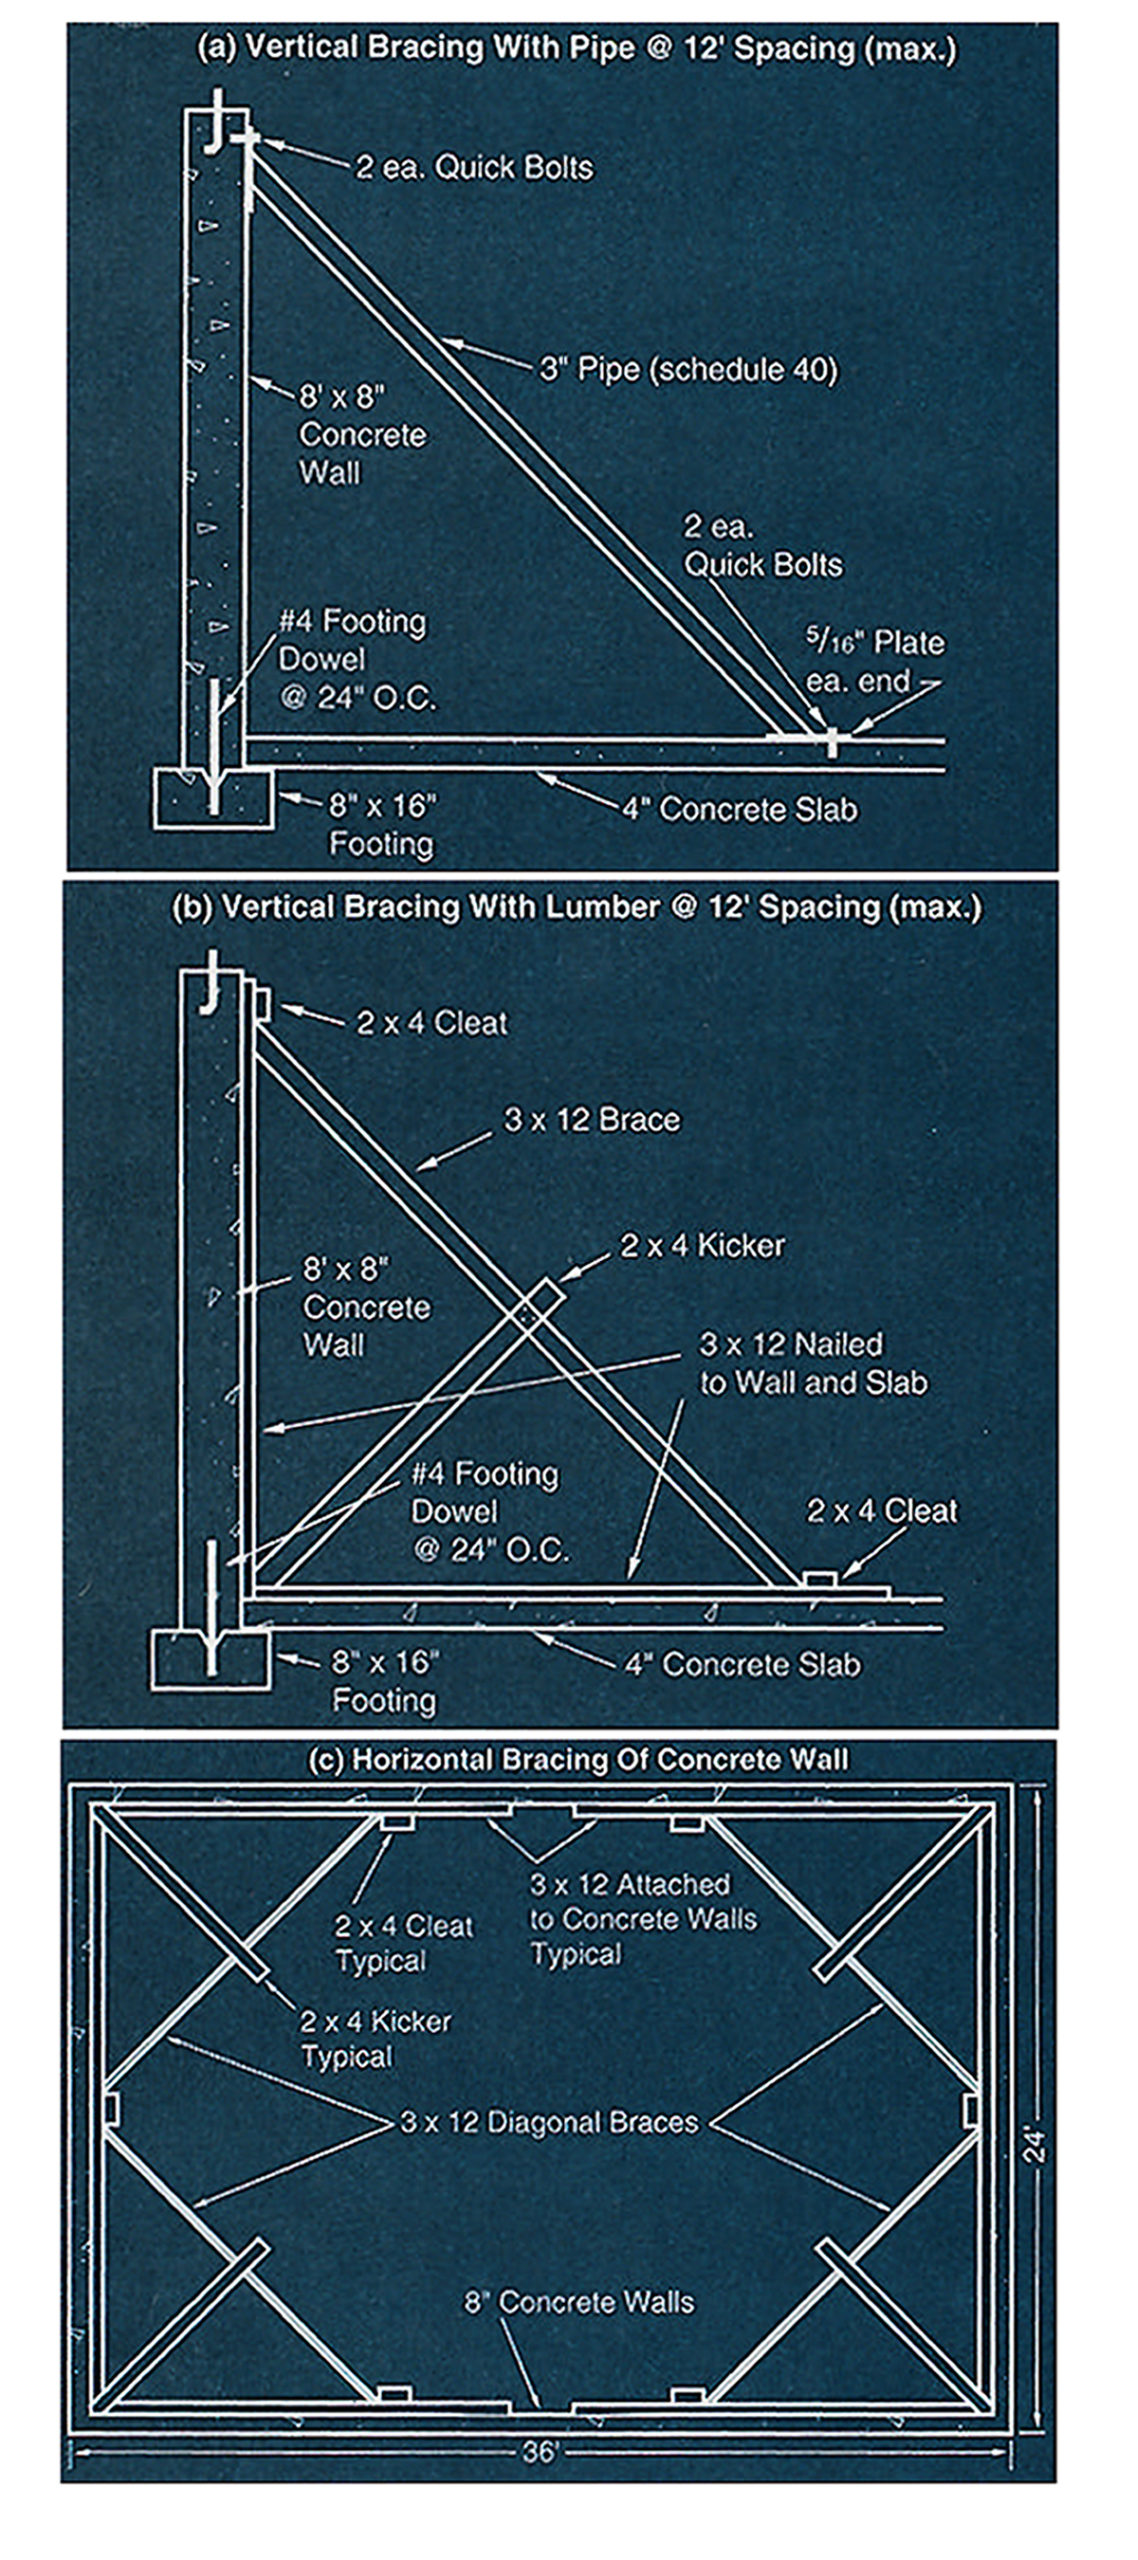
An alternative is bracing the walls before the deck is built. We do this for all straight walls longer than 24 feet that don’t have offsets or pilasters. Corners, offsets, and pilasters add structural stiffness to the foundation wall. But we figure, as a rule of thumb, that the stiffening effect is negligible when further than 12 feet away from a corner. Hence, straight spans longer than 24 feet need bracing.
We use vertical bracing—steel braces fabricated from 3-inch-diameter schedule-40 pipe—which we quick-bolt to the wall and slab or pier pad, as shown in Figure 1a. We also modify some shoring jacks from a form manufacturer to do the same thing. Another option is bracing with lumber, using scaffold boards or 3x12s, as shown in Figure 1b.
If the slab and pier pads can’t be used for bracing, horizontal bracing as shown in Figure 1c is usually adequate. Attach 3x12s to all four walls, parallel to and about four feet above the footing. Then toenail 3x12s diagonally across the corners as shown. Add 2×4 cleats and kickers to prevent slippage and flex. This system works well for walls up to 48 feet long. Beyond that length additional intermediate vertical bracing is needed, attached to pier pads, footings, or wood stakes firmly driven into the ground.
Although most building codes require that foundation walls be adequately braced before backfilling, most home builders don’t use braces for poured concrete walls. They believe that the concrete is strong enough to resist pressure caused by backfilling. And they may get by without damaging the wall. But too often a wall gets pushed in (Figure 2). Sometimes this happens during the winter when concrete doesn’t gain strength quickly because of low temperatures. Sometimes it’s because the excavating contractor’s equipment gets too close to the wall. And sometimes rain saturates the area around the foundation soon after it’s backfilled, increasing soil pressures enough to cause a wall failure.
Whatever the cause, the home builder is left with a costly problem. Fixing it will require pushing out the bow in the wall and repairing the crack with epoxy injection. As insurance against a wall failure, having two carpenters work a couple of hours bracing the wall is a good investment.
Choosing the right backfill material
Some people recommend backfilling with a free-draining granular material. I’m not so sure that’s always a good idea. When you dig a hole in the ground for a foundation, water moves toward the hole just as it does in a well. A granular fill makes it easier for water to move toward the foundation wall. And if the drain tile system gets plugged, that could cause problems.
I think the object should be to restore equilibrium, as nearly as possible, to the soil moisture system. That usually means putting back in the same soil that came out. But not if it’s a poor soil. If heavy, moisture-laden, or expansive clays are removed during excavation, granular backfill with an exterior drainage system would be the best choice.
Also avoid backfilling with large clumps of clay or with soil full of roots, tree branches, or other organic materials (Figure 3). These materials won’t compact well and will hold a lot of water even if the ground slope is steep enough to carry surface water away from the house.
The amount of overdig for a foundation is about three feet. Splash blocks for downspouts don’t usually carry water more than a foot or two away from the foundation (Figure 4). So most of the water that comes off the roof may still end up next to the foundation if the backfill is porous.
Compacting the backfill

Figure 2. Backfilling pushed in this unbraced wall and cracked it. The diagonal crack was repaired by the home builder, but the wall still leaked when the owner moved in. Fixing the problem required excavation, pushing out the wall, and installing new waterproofing at a cost much greater than doing the job right the first time.
As backfill soil settles, drainage patterns change and water may flow toward the house or pond next to the foundation. Compaction is needed to reduce the amount of soil settlement that occurs with time.
Failure to compact the soil can cause basement leakage even before the house is completed. Figure 5 shows the results of poor grading and no backfill compaction. In this case, during rainy weather, water collected in the trough caused by settlement and started leaking through shrinkage cracks in the foundation wall. Correcting the faulty drainage stopped the leaking.
Be careful when compacting backfill. Some compactors are powerful enough to damage the wall. One way to avoid this problem is to place the backfill in 6-inch-thick lifts and have the laborers tamp it with foot pressure or hand rammers. Vibrating plate compactors also can be used for granular backfill without damaging the wall. It takes more time to compact thin layers, but the method provides insurance against wall damage and against callbacks related to drainage problems.
Final finishing to the correct grade
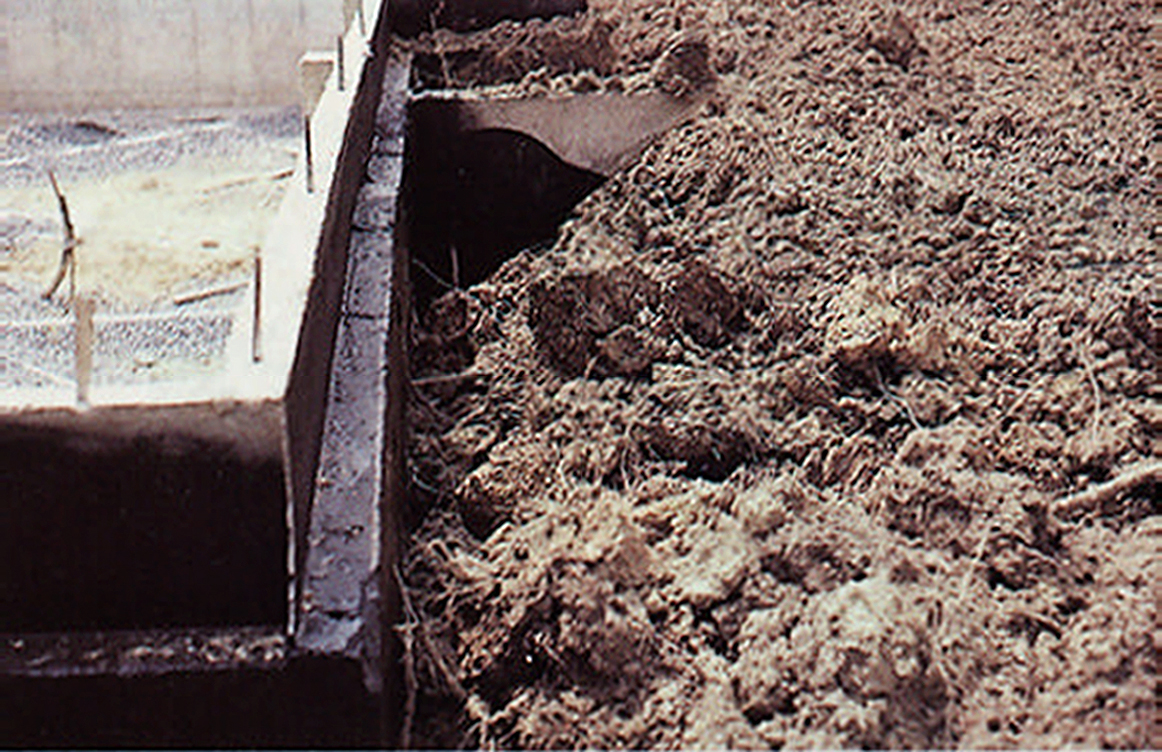
Figure 3. Backfilling with soil full of tree roots leaves a porous fill that can cause basement leakage. The fill can’t be properly compacted and will settle with time.
Diverting surface water away from the foundation is one of the most effective ways to prevent basement leakage. The minimum slope for finished grade should be 1/2 inch per foot for at least 10 feet away from the foundation. This is especially important if there are landscaping beds near the house. Watering plants in low-lying areas close to the foundation saturates the soil and makes basement leakage more likely.
If the house is set high enough on the lot, getting the correct grade for drainage isn’t difficult. Too often, however, houses are built too low. Then instead of the code-required eight-inch minimum between the sill plate and exterior grade level, the house might be built with the finished grade only four to six inches below the plate. To avert this problem, avoid making the excavation too deep and set footing elevations high enough.
Avoiding basement leakage is a lot like preventing a roof from leaking. You need to keep the water moving and prevent it from collecting in one spot. Correct backfilling methods help to accomplish this goal.

About the Author
Buck Bartley is a founding member and former president of the Concrete Foundations Association and retired as president of Bartley Corp, a concrete contractor in Silver Spring, MD. He remains, however, involved in the industry through the American Concrete Institute’s code committee for residential concrete construction (332) and consulting the current generational leaders of the company he founded with his brother.

Association Resources
The content of this article is part of a much larger construction basics course available for members of the CFA through the online Classroom. More information can be found at www.cfaconcretepros.org or by calling Association headquarters at 319-895-6940.